Monday, August 1, 2011

Connecting (or not) in the Salish Sea Pt 1.

August is in full swing! Dervish is moored on Orcas Island, and I am busy working for the rest of the month.  So, I thought I'd write up a run down of 300+ miles and 30 days of July cruising to and through the San Juans. Why so late? Well, I purchased a T-mobile USB broadband widget so I could blog along my journey. The saleswoman and coverage map confirmed that I would have a connection nearly everywhere I planned to travel. In reality, I rarely got a connection and when I did it was slow and inconsistent with few exceptions. At first I was irritated, then I gave up on blogging and gave in to the impulse to "unplug" for awhile. It really is quite refreshing. I recommend it.

The first month of my summer cruise has been sensational. My trip started July 2nd with my sweetie, Shawn and my dear friend, Molly aboard.  She's a musician, actress, writer and sailor, and he's a mechanic, musician, mcgyver-magician and sailor.  With my dream of a boat-traveling troupe of dramanauts alive, we left West Bay, Olympia and headed up Case Inlet toward Jarrell's Cove. When rounded the northern point of Hartstene Island, our lazy, broad reach in 10 knots, turned into 20 on the beam with quite a bit of fetch in narrow Pickering Passage. Before long, we opted to motor into the cove where we anchored for the night and partied with the locals. 


Having a nip of rum aboard s/v Ichiban.


Later Molly chauffeured us about in the dink.


Two days later, we had headed out from Jarrell's Cove on our way to Quartermaster Harbor for the fireworks. Shawn noticed some smoke in the cabin and discovered the exhaust elbow had a pinhole on my old Farymann 12hp one-lunger. We stopped off at McMicken Island and Shawn did some macgyver magic with epoxy goo, a mint tin, and some stainless steel wire.  

Not a bad fix, really.
We continued on our way toward the Tacoma Narrows. We were late due to the repair, and hit some current. After fighting it for awhile (too long, I am sure), I concluded the most prudent thing to do was to return to Olympia and get a proper fix on the motor. She was holding up just fine, so we spent the 4th of July watching distant pyrotechnics from anchor off the southern tip of Key Peninsula. 

View from Devil's Head.

Next day at Boston Harbor I got busy looking into getting an exhaust elbow for my ancient motor. I called the dealers, searched the message boards, and finally found a part that could be shipped from Germany for an arm and a leg. Plan B: get it welded. the local shop, Ziegler's could handle it and quoted me $80 and 3-5 days turnaround. Shawn removed the part, and we rushed it right in. Donny took a look at it, asked when I needed it, to which I replied, "well, my boat is anchored at Boston Harbor with no motor and a winds predicted, so, uh... as soon as you can. Please."  He mumbled something and disappeared through a door. Twenty minutes later he brought it out finished and looking beautiful, and charged me under $40.  Now that is good hometown service!

Shawn installed it the next day. Like new and away we go!


Tuesday, June 14, 2011

Fettling: the Joys of Kerosene

Patience is a virtue for any sailor, and thirteen has always been a lucky number for me, so it was no surprise that it took thirteen attempts to get my fabulous, vintage Hillerange kerosene stove working efficiently again. It was more than I had bargained for, but fettling is an art that I have come to appreciate if not fully enjoy, and the journey, though long, was interesting and had many a twist and turn! Here is my story:


Dervish, my Cal 2-29, came with a beautiful, vintage, pressurized kerosene range. I had never used a kerosene stove before, but figured I'd give it a try. All last summer I cooked on it, and grew to love it for its  super-hot regulated flame.  The key to a clean flame with kerosene, is to make sure the fuel is fully vaporized. As a liquid it burns yellow, less hot, and is very dirty; it can leave pots, pans and the cabin top sooty. Kerosene is smelly when in liquid form; the fumes can even make some folks sick. As a gas, it has only a hint of an odor, burns blue hot and leaves nary a trace of soot.  I actually like the smell a bit. It takes me back to another time. I suspect I may have been a mariner in a previous life, but that is another story.  Back to the stove...

Gradually over the year, one burner started to seep from the jet, first leaving the burner wet which caused smoking, and later, entirely filling the spirit cup each day. This was stinky and made my guests complain. Quite honestly it was a major pain in the butt to deal with; I had to pressurize and de-pressurize every time I used the stove, and had to sop up puddles daily. The entire cabin began to have an aroma of ode-to-musty-old-sailboat.

Everybody I know tried to talk me out of saving the old range, but I knew I had a good thing and dedicated myself to fixing it. The more I researched kerosene the more sense it made to me. It is clean, cheap, super hot (equal to propane) and has a very high flashpoint (higher than diesel and just below cooking oil) which makes it safe, unlike propane which can go "bahboom" on you. I vowed to bring my old stove back to her full glory.  Little did I know that the adventure I was setting out on would take six months, cost nearly $300 and require the cooperation of people all over the world.

Locating parts for a pressure kerosene burner is very difficult. They don't manufacture them in the USA and there are no major distributors here either. Eventually, I located a company in the UK that sells spare parts, though no complete burners. Mike the Stove Guy at Base Camp was very helpful, and after a long telephone conversation I ordered a bunch of parts to rebuild my leaky burner, and some extra parts just in case.  Sure, it ran me nearly $100 but that seemed cost effective when weighed against buying a new range and installing it. 

The parts arrived and sat in the box for months. Over and over I looked at all the little bits and pieces until I convinced myself that I could never assemble such a thing. The leak got worse, and eventually I stopped using the stove. Plus I was landlocked after my injury and couldn't get to the boat all winter.  When spring rolled around and I moved aboard, I decided I better just jump in and do it. Nobody was going to do it for me. I found a used book by Ferenc Maté, Shipshape: The Art of Sailboat Maintenance, which has a useful exploded diagram of the kerosene burner assembly.


 (This is a great book, and you should click on the Amazon link right now and buy it! Especially, if you have a kero stove or heater.)  Armed with the diagram, I dove into the project and discovered that some of the new parts were not quite right. 

 
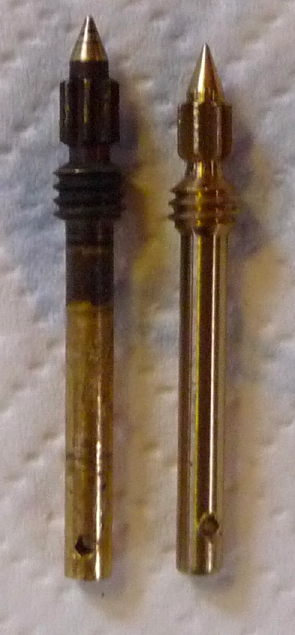
The old spindle is on the left and new on the right. Notice that the length is different. This caused the hole (at bottom) to not quite reach the knob that it mates to. It also has slightly different threads that make it incompatible with the old needle. I ended up cleaning and sanding the scores out of the old spindle. I installed a fresh graphite packing nut and after several attempts managed to seat it properly. Voila! She burned without leaking. 

For a day!  Then I noticed a flame under the burner where the gas tube attaches. I had caused a stress fracture from all the gripping during the several tries at seating the spindle and aligning the needle cogs.  You can see the flame in the wrong place in the photo below.


At this point I did what anybody would do: I turned to the web. I found an awesome online forum,  Classic Camp Stoves (or CCS) for kerosene enthusiasts and became the darling of the forum for a couple weeks.  I sought to buy a plug for it, figuring that I simply wouldn't use that burner. I really only need two burners. I convinced myself of this. But it turns out the threading is insanely arcane at 37/64ths diameter and 34 threads per inch at a 55˚ pitch. Nobody had a plug for the thing. Nobody! So, being resourceful, I tried putting some JB Weld on the fracture, which stopped the leak--for awhile. On the third use it got too hot and crumbled off. With few options left, I located a shop in Tacoma where they cut the burner apart and silver soldered the bottom for me. 


I now had a plug that would thread properly. I brought it home and put it in. Finally, I thought, I can cook again! Wrong. The old asbestos washer beneath the plug crumbled. Discouraged, but not defeated I sought professional help from the CCS Forum again. Several forum members coached me on what to do to stop the leak. This phase included driving around to auto repair places trying to get head gasket material custom punched to the proper diameter and thickness. A nice mechanic took pity on me and sent me home with a variety of different copper washers. I tried again and again. But still she leaked! More than ever, in fact!

I must admit, readers, that at this point I actually shed a few tears of frustration. I am not naturally inclined to fix things. I am, and always have been, more of a thinker than tinkerer. I whined a bit about my failures on the forum, and "Kerophile" took pity on me and sent me custom washers in two different thicknesses. These were hand fabricated in the northern most tip of Scotland and came in the mail about a month later!   Kerophile is a dear old Scot who is available to help silly sailors like me with our stove troubles. I didn't know if the washers would solve my problem, but regardless of that, I needed the encouragement and the support he offered. It felt good just to have somebody say my stove was worth saving, and that under no circumstance should I switch to propane. Ah, the connections one can make on the interwebs!

Meanwhile, I was on a mad search for a completely new burner. There had to be one out there somewhere and by God, I was going to find it. I haven't been called a "Research Queen" for nothing, so find one, I did with a tip from another forum member. Southern Lamp and Supply sells Hipolyto burners which are made in Portugal and completely compatible with my original Patria burners (also made in Portugal). I tried to order three (you know, just in case!) but they could only get one for me. Evidently, even the Portuguese had run out!  As far as I know Southern Lamp will be able to get more of these burners in the future, so if you are looking for one, give them a call.

I also got a hold of A and H Camp Stoves in California. It took several calls and emails to get a response; they are a small outfit, but they found one dusty old Patria burner on their back shelf. It was missing a few parts so they hadn't sold it. I bought it from them and waited for the mailman. I also spent an afternoon talking with various Amish men. Each thought another guy might have a burner somewhere. The Amish use kerosene almost exclusively and although very friendly, they are sometimes difficult to reach given that most do not use telephones. I had some delightful chats with various chaps, but nonetheless, the Amish whirlwind did not yield any regulated burners. 

A couple of weeks later my first new burner arrived from Portugal via North Carolina. I didn't waste time, but immediately tried to install it along with a new washer/gasket. All went well, except that once I had it tightened down, it was not aligned with the control knob. Now, I know better than to over-tighten things, but it only needed about 1/8th of a turn. I held on with pliers and wrenched that baby hard!  Something gave.  Oh, shit! I bent the feed tube (if only I had used vice grips for a better hold!) and fractured it.  I had the new burner, but the feed tube was now cracked and gushing kerosene. (It was later pointed out to me that I had forgotten to put the spirit cup on, evident in the photo below. Doh!)


Once again, I cried. I know most people get mad and swear at these moments, but I cry. Guess that is just my way. 

But would I give up? Hell, no!  When I set my mind to something, I do it. One way or another. So, I cleaned up the stinky mess and posted on the CSS forum again.  This time, Dale, a sweet and helpful sailor up in Chimicum, offered to solder my feed tube for me if I brought the stove to him. I did. Shawn helped me wrestle it out of the boat and off we went up the Olympic Peninsula. It was a beautiful day and I felt enthusiastic. Finally, my stove would be working, and I could move beyond the raw food diet I had been forced to live on. I think it was around this time, I dubbed the stove, "Faith."

Dale was wonderful and spent four hours teaching me everything about kerosene burners and the finer details of maintenance. In the end, he soldered the tube up and after testing it with soapy water and an air compressor, sent us on our way. 


When we got  back to the boat, Shawn lifted Faith aboard for me and we fired her up. Guess what? Kerosene penetrates like nothing you have ever seen. So, yes, you guessed it. It leaked through the solder. Okay, this time I didn't cry, but rather uttered some choice expletives. But give up? Hell, no!  

Three more days of calling radiator shops and refrigeration repair places. Nobody would touch it.  Finally, I removed the copper tubing assembly and drove to the biggest machining, fabrication and welding outfit I could find, Mega Machine. I walked in there and told the receptionist that I was not leaving until I either had the thing repaired or the name of somebody who could do it. She called up Larry from the shop, who told me they didn't do that type of work there. I said I knew this, but surely there was an employee or somebody that someone knew who could do this work for me. I repeated my intention of staying right there in that office until I had a lead. I would not take "no" for an answer. Larry, scratched his head for a moment, then told me to look up Bert at Inlet Connections. I threatened to return if Bert couldn't do the job; I was not going to let Larry off the hook. He appeared annoyed, but secretly I think he was a little turned on by firm resolve.  

I headed downtown to Inlet Connection to talk to Bert. I found him in his shop and explained my  dilemma. He told me he had silver soldered custom artsy sprinkler heads with dragonfly wings and layered flower petals. He made custom fixtures for the State Capitol building. I knew right away, Bert was my guy. Soldering stoves was not something they do at the radiator repair shop, but he was willing to do it "on the side" for me when he could find the time. I left the burner assembly in his care and hoped he wouldn't take too long. The very next day he called me. It was done. All he needed was for me to pick up a fifth of Crown Royal Reserve. I did. And for that bottle of whiskey I got my fuel tube repaired. Now that is the way the deals should work!


Back on Dervish, Shawn and I installed the thing and managed to get the burner on, aligned and tightened just right with a combination of new washers from Scotland and the thin asbestos ones that came from Portugal. The trick is to use enough washer material to get the burner to tighten down AND line up with the knob assembly. To do this you have to experiment a bit with different combinations of washers. I fired it up , and oh baby baby, she burned. No leaks.  But the next morning as I tried to boil water for coffee, something was still wrong. The flame puffed and fluttered and then went out with a huge plume of black smoke. What!?  

Turns out I was out of kerosene, so the final chapter of this story involves researching the best fuel to burn in good old, Faith.  In hardware stores you will pay up to $12/gallon for K1 grade kerosene. But did you know that jets use kerosene as fuel? They do. Airports have huge tanks of what they call Jet-A fuel which they sell for around $5/gallon. This is basically the same as K1 but a bit more refined. If you ask them for the sump fuel (the stuff they drain off regularly to check for contaminants) they will give you an even better discount. I got a gallon for $3 and was told I could get all I want at that price. And let me tell you, the stuff burns hot, clean, bright, and almost without any odor. I love love love it. I still haven't used the oven, but the burner in it works. I need to buy a thermometer and figure out a way to keep the temperature more or less stable. I'll be sure to post my experiences with baking in Faith as I gain them.

So, there you have it!  My fabulous fettling ordeal and the grand success at the end of the story. In truth, my stove is still not 100%; I now have another burner that is a little seepy (probably from all the tweaking and stress of disassembling and reassembling).  But I can fix it. I know I can!  I have the parts, I have the knowledge, and I am developing the patience. Fettling isn't for the weak willed, but then, neither is sailing.  

Feel free to contact me if you need encouragement with your old kerosene stove. I just might be able to help.


Friday, March 11, 2011

Engine Alignment and Spinal Recovery

This week my dream, six years in the making, quietly emerged; I now call s/v Dervish my home. In truth, I will be spending most of March and April away as I work a temporary job to feed the cruising kitty. For now, this week, I am aboard and surrounded with all the stuff I couldn't bear to part with. I have been paring my life down with each move (6 moves in 8 years) and still I find incredible redundancy. I own so many objects in duplicate or even triplicate. I never realized this before. Look around, I bet you do too--unless you live on  a boat, in a bus or on a bike.

The actual move was brutal due to a late February blizzard that left the docks iced over and treacherous. This, combined with steep low-tide ramps, made transporting my carloads of small boxes (small because I can't carry more than 25 lbs) nearly impossible. But tell me, what is the use of realizing a dream if you don't have some adversity to overcome? Just like a good movie plot, I had many obstacles between me and my aim. 


My spine is still healing; I am now in the fifth month since the big crash. I am pretty much out of alignment from occiput to sacrum, however, each week is a little better than the last.  I can feel my core muscle strength developing. Carefully shoveling snow with a small dustpan served as a meditation in conscious movement. I worked for over two hours clearing the deck and chipping the ice from the cockpit so the scuppers would be clear when it finally started to thaw. In addition to my boat work reconditioning regime, I continue physical therapy and weekly massages. I am determined to return to my pre-accident condition or better. I fully intend to sail my little ship north this summer.

Meantime, I plod along with the boat projects. Dervish was in desperate need of her own alignment; the 12hp Farymann A30 single cylinder diesel engine was as out of whack as my back.  I always thought the motor seemed to jump around a lot and was terribly noisy, but since I had zero experience with one cylinder engines, I accepted it as normal. Wrong.


It was nearly a quarter inch off (no kidding), which was likely the cause of my dripping "dripless" shaft seal. That seal has been leaking since the day I launched Dervish. First time out I noticed water spraying from it and running into the bilge. It wasn't much, not enough to trigger the bilge pump's float switch, but enough to coat everything with sea water. I soon tracked down the shop that installed it in Coos Bay, Oregon and eventually got the technician on the phone who did the work. He remembered the boat and assured me it would improve with time, which it did. Evidently the interfaces need a little run time to mate up properly. It did improve after a few hours of use, but all last year, the seal continued to spray a little when motoring.

Shawn and I took a look the motor mounts, and he pointed out that they weren't easily adjustable with a simple turn of a nut like some are. I noticed the port side had a shim between the mount and the stringer that the starboard side did not have. My engine was actually laying on the starboard stringer as a result of the sheared bolt, and missing second mounting boltCorrecting this would bring everything much closer to proper alignment. Shawn was able to jack up the motor and add the missing shim to the starboard side, replace the bolts, and align the engine coupler with the shaft coupler. Below is the starboard mount after the fix.


Like me, it isn't in perfect alignment, but it's much closer to the specified gap allowance. I haven't had a chance to take her out for a test yet to see if it solved the spraying shaft seal issue, but I do know that there is a significant reduction in vibration and noise. And I can rest assured that my little one-lunger isn't going to rattle completely loose!

While we were in there, we took the raw water and exhaust hoses off. I was amazed to see how much crud had encrusted the engine water intake. Unbelievable! The diameter of the pipe was probably reduced by about 25% due to the build-up. Shawn scraped it out with a screwdriver. Eww...


The water hose had chafed pretty badly in a couple places, so it was prudent to replace it. We looked everywhere for a decent one and ended up buying some West Marine hose which, although it had the same inner diameter, was much thinner walled than the original. Seems most things are poorer quality anymore. Shawn zip tied a little extra chafe protection on just to be on the safe side. (I like the safe side!) The picture is at a poor angle which makes the bend look much sharper than it really is. The new exhaust hose is also visible in the lower right.


As I type this from aboard Dervish, my neck grinds a little with each turn and my back has "adjusted" more than once already today. I may not yet be completely straightened out, but at least my motor aligns and my hoses are new! It will officially be spring in less than two weeks, (lovers awake!) the daystar burns through now and then, and I continue to meet interesting new friends who want to sail. The adventure is beginning, and this time around there is nobody but myself to hold me back. Watch out! 


Saturday, February 19, 2011

Charging Forward Old School!

My Cal 2-29, Dervish, has been getting some major work this month. I've got several projects going on and could almost do a post everyday, if I weren't so darn busy tending to my life. I'm out of my apartment in a week, trying to line up some temporary work to fill the proverbial "cruising kitty," and even managing to find time for dating. I won't be going into that today though. Instead, I'll limit this post to recent work on my charging systems.

Dervish inherited quite a lot of hand-me-down gear from Nomadness and the Microship, for which I am very thankful. One of the more useful things was a TrueCharge Statpower battery charger. (It is now the Xantrex TrueCharge.) At a measly 10 amps, it is a bit on the small side, but since Dervish doesn't have refrigeration, or power hungry instruments, she uses very little power now, and will use even less once I swap out the failing, fluorescent cabin lights for a couple of low power LED dome lights.

The TrueCharge unit, though originally thought of as a temporary kluge, has been working sufficiently for a year. Why not stick with it?  It is a three phase smart charger with dual leads for my two batteries. It is now mounted at the back of the starboard quarter berth where the old scorched Dytek charger once lived and died. In some ways this isn't the best location because I intend to use that berth for storage, which will make it tough to see the charge status lights, but again, convenience dictated. Better to get it done than put it off again waiting for the perfect solution. Moving it later is always an option.  At least it's not simply clipped on as it had been for the past eleven months. I've already had one fire as a result of that! (Click here to read that adventure.) The switch next to it may not be necessary, but it was already wired in to the shore power. I figure if something were to go "haywire," I could manually shut off the charger. Then again, I could probably disconnect shore power more quickly. 


Next we tackled the bigger issue: the engine charging system.  Last summer one of my two batteries had bloated up a bit. We suspected it had over charged, so Steve disconnected the alternator before I put in two new group 27 deep cycle batteries.  I didn't want to risk damaging them with over 16v or more surging in. 

The alternator remained disconnected for all of my outings last summer. It wasn't too much of a problem really, as I was rarely on the hook, and miserly with power the few times I did anchor out. Still, I knew it was something that seriously needed attention. For Dervish, I try to only buy new gear if the old stuff can't be fixed, or if it becomes (or could become) a safety hazard. I like to stay old school when possible. In that spirit, we carried the alternator and voltage regulator to the local guru at Dan's Alternator and Starter Service. 

Now, Dan is one of these guys that does what he knows how to do, and does it very well. One thing Dan knows, is alternators. He knew my Motorola 37 amp 12v marine alternator intimately. He is also a nice guy and honest; he isn't going to try to sell you something you don't need. Especially not if he can fix it. Dan clearly takes pride in keeping old parts functioning, which, in this day and age, is a rarity. Evidently few shops still rebuild components like these. Why should they? Can't you buy a new one for nearly the same price and get a warranty? Sure, you can always buy a new something, but rebuilding or refurbishing an old part to give it new life, is more satisfying. If guys like Dan can stay afloat in their business for a few more years, I think they will recover. If our economy continues downward, people will be forced to repair what they have. When goods become too expensive in a market where the dollar is no longer almighty, guys like Dan will be highly valued.  But I digress...
Dan said he would test the alternator and open it up to see if a rebuild was in order or if it was irreparable. If I needed a new one, I thought I'd get something beefier than 37 amps, something newfangled with an internal voltage regulator.
In the shot above Dan is opening up a Delco alternator, not mine, (unfortunately, I didn't get down there with my camera in time) or even the same make, but he reminded me as he opened it that "basically, all these things work the same way."  


Most alternators look something like this inside. Again, I was delighted to discover that it isn't really all that complicated. It is empowering to demystify some of this stuff. Strange that it took me so many years to discover that I actually enjoy learning how things work. 
Alternators have stator coils fixed to the housing and rotor coils that are driven by the motor. The rotor produces a field current as the coils rotate. The strength of the field current determines the strength of the magnetic field. The magnetic field has, like all magnets, a north and a south pole.  The rotor, driven by a pulley when the engine is running,  supplies current to the coils via a set of brushes.  As the rotor coils couple with the stator coils it produces A/C, which is passed through a few diodes that rectify it into D/C which can then nourish your batteries.  

When Dan took my alternator apart, he found the brushes and coils were absolutely fine. The bearings, however, were toast. Below is a bearing exactly like the one from my Motorola. This one is pretty gunked up, but evidently mine was worse. 
Fortunately, I hadn't run it until it had frozen up and completely destroyed the whole unit, so Dan was able to replace the bearings without having to do a total rebuild on it. He assured me it was a good little unit worthy of reuse.

When we returned a few days later to pick it up along with the new voltage regulator, Shawn and Dan marked the wires and terminals to insure proper installation of the new regulator. You really do not want to hook it up incorrectly, and it isn't all that obvious by looking at it, which wire goes where. Here it is all clean and reinstalled. The new voltage regulator is fastened to the inside of the engine compartment just a few inches to the right. It has been tested and works great! Plus I get "reuse" points, and I saved around $60!
Times are tough and the economy is poor; little shops like Dan's are becoming scarce. I encourage anybody in the South Sound area to take your business to Dan the alternator man. He'll fix you up. Old school. His shop is a metal mess of parts both new and used, but Dan knows exactly where everything is. You can easily miss his sign on Black Lake Blvd, and I told him as much. He said he was thinking of investing in a new one. He knows an aspiring, young artist whom he'd like to hire for her first paid job. If you visit him, be sure to tell him Sky sent you!  
3614 A Black Lake Blvd. S.W., Tumwater, WA
(360) 352-4523


Sunday, February 13, 2011

Pedestal Project

As the long awaited and highly anticipated move aboard date approaches, I find myself excited and yet, a little panicked. Over the past week, I have had some recurring thoughts: Where will all my stuff go? I have no hanging locker. I have no refrigeration. My fuel tank is empty (and probably growing all sorts of biology). My charging systems are either jury rigged or completely disconnected. My vintage kerosene stove has a leak (I bought the rebuild parts from England eight months ago, but have I not fixed it yet). My wheel is so stiff that the rudder hardly moves, and like every boat I've known intimately, my plumbing could use "some work." I wouldn't even let myself think about wiring. My how quickly a perfectly sailable boat can become The Project Made of Many Projects.

But if you know me at all, you know that I am not easily daunted, and although I am still healing my injuries, I am ready for whatever the universe throws in my way. Nothing like a few hard knocks to wake me up and send me crashing straight through a stagnant phase. (I think Gurdjieff called these shocks.) I hold the same thought/feeling each night as I drift between the lucidity and dreamland. I envision good things working their way to me. Right now.

As it turns out some of these were much closer than I ever could have imagined! A friend I met awhile back had offered to help me with some boat projects. Shawn is a competent mechanic who understands the workings of marine systems, so I brought him aboard Dervish, to give her a looking over. He decided the steering pedestal would be a good project to start with because "you don't want that thing failing on you."

The first step was to open it up, so I could see how it worked. It really isn't such a complex thing. Here you can see the two cables, one for shifting and one for throttle. The big chain that couples with a brass sprocket (much like a bicycle) controls the movement of the rudder through cables and sheaves.


You can see that it was quite grimy. Shawn cleaned and lubed it up, but it remained stiff. We discussed the parts that could be the culprit and came to the conclusion that the bearings may be bad; I ordered a pedestal rebuild kit with needle bearings from Edson and waited.


When we returned two weeks later, the wheel was moving nicely due to the lubrication having worked its way in. I didn't need the kit after all! Shawn dismantled the rest of the pedestal parts and sent me home with some sanding and clean-up to do.

Unfortunately he also found what we thought was a broken bolt, but what turned out to be a broken off drill bit. Ultimately, the pedestal would get reassembled with only three of the four fasteners. Though he did install a stud to help hold the bottom half in place. I don't know how long it had been that way, but I am sure she'll hold up just fine.


Once the parts were sanded and cleaned up, Shawn put a few coats of Helmsman Spar Urethane and some fresh paint on, and we met at the boat for reassembly. Here he is drizzling a bit of motor oil onto the chain to lubricate it.


After dry fitting the pieces together, a bead of 4200 polyurethane was used to seal it.


Here is the final product. I just love how tidy and pretty the whole thing looks. Much better than it was, and most certainly better than I could have done. I am inspired to sew up a cover for it now.


I am honored to have so much generosity and expertise come my way. This week I plan to take her for a spin, fill her up with diesel and begin to prepare my little escape pod for full time living.

Next up? The charging systems. The stove. And art and adventures.


Monday, January 3, 2011

New Direction


It has been been nine months since my last post, and my life has convulsed into an absolutely different shape. I haven't been able to write about it because, as they say, it was too close. I have decided to do a short recap here to clear the way for what will come.

The series of unfortunate events.
At the time of my last writing, my father's health was declining and shortly after that post, I made the decision to move to Olympia to be near him. I made the trip south from Oak Harbor to Olympia in three days with my sister aboard. She had never been on a sailboat, but picked it up quickly with my gentle instruction. We had a fantastic sail one day from Kingston to Gig Harbor on a 15 knot downwind run. I gained immeasurable confidence on the trip which went smoothly and without incident. Here is Gail at the helm just off Seattle.


Soon after arriving in Olympia, I found a studio to rent for Steve and I to use as an office and home away from the boats. Plans developed, and eventually Steve and I brought Nomadness to Olympia where she was hauled out at Swantown for a bottom job. Once the work was done we moved her to West Bay Marina to share an end-tie with Dervish. It wasn't long before Steve decided Olympia didn't work for him, and he resolved to move Nomadness north.

Meanwhile my father's health declined and my obligations to family increased accordingly. I became caregiver for my father while living alone in the studio. Then on October 1st, while Steve was sailing north on Nomadness to her new berth in Everett, I was rear-ended at high speed on I5 after having taken my father to Virgina Mason for a consultation. The accident was severe and traumatic. My car was totaled. As it turned out this accident would generate a shockwave through every aspect of my life.

By this time, it was clear that the universe was not cooperating with my plans. Nomadness's future no longer included me. I found myself facing months of recovery primarily alone and unable to move aboard. I thank the heavens for my loving and very devoted friends who have helped me through this by chopping wood, bringing food, making me laugh, and just being present with me through it all.

Long story short, my father passed away at the end of October from complications following the surgery for which we all had been waiting. There are no words rich enough to capture the heart's story after an event like losing a parent. Dad never boarded Dervish, but I am thankful for those last months with him. Although my personal life was in shambles, my spirit congealed around the understanding of what really matters in one's life: tender moments of compassion and lasting love. Here are my father and brother on Dad's last fishing trip.


I am still in recovery from my accident but doing better each week. My plans for the near future are to get strong enough to move aboard Dervish and reinvent my dream, while striving to keep my heart open. Everything is fuzzy, but focus will come, my core will strengthen, and soon the future will unfold and reveal unimaginable joys and adventures. Right?

Meanwhile, I am back to writing. I am currently working on commission to revise a play about the wife of the abolitionist John Brown. There will surely be a post on that as I flesh it out for a public reading.

And work progresses on Dervish as well. Current projects include rebuilding the steering pedestal and improving the electrical system; I'll post details of those projects as they come to completion. I might even find my way back to writing a blog about living on a sailboat in the Salish Sea, making art and love while discovering friends and other treasures along the way.